Building a Microservice in Python

Microservices in recent days has been the very hottest topic in technology and the microservice architecture is being followed by technology giants like Netflix, Twitter, Amazon, Walmart, etc. as well as several startups. They are the perfect fit for the nowadays agile software development process where continuous innovation happens and products are continuously delivered. Let's find some more details about microservices:
The Basics of Microservices: What and Why?
Going by the definition:
In microservice architectures, applications are built and deployed as simple, highly decoupled, focussed services. They connect to each other over lightweight language agnostic communication mechanisms, which often times means simple HTTP APIs and message queues and are resilient in nature.
Microservices may contain several independent services which are created to serve only one specific business function and communicate over the lightweight protocol like HTTP. It is somewhat similar to SOA (Service Oriented Architecture) which is often implemented inside deployment monoliths leads to the problem of having monorepo. In a monolithic architecture, which is the biggest rivalry of microservices architecture, all the business logic are present inside a single service which is a hell of a mess when it comes to maintenance, testability, and deployment.
Benefits of the architecture are:
- Continuous Integration and Deployment (CI/CD): Microservices can be managed by a group of small teams and as they are independent and highly decoupled which allows changing, removing or adding the code without affecting other application.
- Programming Language and Framework Independent
- Containerization
- High Scalability, Availability, and resilience
Now, as we have gathered a few basic concepts of microservice, Let's know-how can we create a one in python.
Using Flask Framework — In a production-grade manner
We will be using Flask as a framework along with its extension Flask-Restplus that adds support for quickly building REST API mainly being used for Swagger Documentation. A simple web application can be created by using Flask and Flask Restplus Api class with a particular endpoint resolving to a route resource and exposes a REST API. Below is an example:
from flask import Flask
from flask_restplus import Resource, Api
app = Flask("app_name")@app.route('/test')
@api.doc(params={})
class TestApp(Resource):
    def get():
        return 'Hello, World!'if __name__ == "__main__":
    app.run(host=HOSTNAME, debug=True)
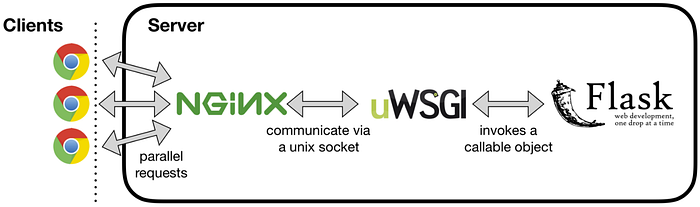
Here, an app is created which simply returns the string “Hello, World!” when a get request with ‘/test’ endpoint is made. But, When this program is started up, the flask has a built-in web server, which will be up and running to serve any request on the host HOSTNAME. But, wait you also see the below message:
WARNING: Do not use the development server in a production environment.
Use a production WSGI server instead.
It means that the default web server will not be able to handle the concurrency, serving static files, etc. very efficiently. In order to solve the problem, we need to have a production-ready web server like Nginx and an application server based on WSGI protocol like uWSGI. uWSGI invokes the callable object of Flask i.e. `app` in the above example program and can communicate via HTTP as well as TCP based Unix socket connection with Nginx web server. Nginx acts as a reverse proxy, caching, serve static content, etc.
uwsgi --http :9090 --wsgi-file app.py --master --processes 4 --threads 2helpful documentation on Configuring Nginx with flask: Official Flask and here.
Python Libraries
In order to perform the business logic efficiently inside the Flask framework, few of the libraries that need are as below:
1. REQUESTS:
In order to read some content from another URI using HTTP request, Requests is all we need. It can make any kind of HTTP Requests GET/POST/etc. with proper timeout handling, exceptions and authorization. We can also parse the response in the content to a JSON object directly. A sample example:
import requests
response = requests.get("https://abc.com/def/hello") #simple GET req
json_response = response.json() #response parsed in JSON
2. MARSHMELLOW:
This is a library which helps when serialization/deserialization are needed. For example, in the above requests HTTP call, we want to load the JSON response in a python class. Then, we can load the JSON response directly into a schema which is having post_load decorator which maps the entities into a class. For serializing the class so as to send it over the network, the python can be dumped in a schema. If a particular field should not be displayed in the response on some condition, we have to write a BaseSchema which removes a particular key in response to some condition.
3. CACHING:
Caching in the application can be achieved in three ways depending on the use case:
a) In-Memory Caching[cachetools]: The items are stored in the heap memory of the application. cachetools provides decorator supporting LRU and TTL based caching algorithms. In LRU, if the cache is full, the item being used very least recently will be discarded and In TTL algorithms, an item is discarded when it exceeds over a particular time duration. Sample example:
from cachetools import cached, LRUCache, TTLCache
@cached(cache=LRUCache(maxsize=32)) #item discarded if size exceeds 32 keys
def get_sum(arr):
    return sum(arr)@cached(cache=TTLCache(maxsize=1024, ttl=600))
def get_value(key):
    return some_fun(key)
b) File-Based Caching: This cache stores the items on the disk. The class werkzeug.contrib.cache.FileSystemCache takes the file directory path where the items will be stored in the system, threshold, and timeout. Sample example:
from werkzeug.contrib.cache import FileSystemCache
fs_cache = FileSystemCache("/tmp", threshold=64, timeout=120)
fs_cache.set(key)  # to set a key
c) Memcached Cache [pymemcache]: The items are stored on distributed systems where items can be stored in a large amount of large size and can be accessed from any host. The class werkzeug.contrib.cache.MemcachedCache takes the tuple of server addresses, timeout, and prefix key if any. Pymemcache is created by Pinterest, which implements different hashing techniques to store the items on the server.
4. CONCURRENCY and PARALLELISM:
Concurrency is when two or more tasks can start, run, and complete in overlapping time periods while Parallelism is when tasks literally run at the same time, e.g., on a multicore processor. Python has GIL (Global Interpreter Lock) that allows only one thread to hold control of the Python interpreter. If a program is running on single-core having a single thread, then the impact is not visible to developers, but when it is run on a multicore system, GIL becomes a bottleneck as only one thread can run on a particular core even the other cores thread can be run in parallel. Python program can be of two types: I/O bound and CPU bound. CPU bound programs require heavy computation and need most of the CPU time to execute the instructions. On the other hand, I/O bound processes mostly communicate with the I/O devices like a disk, external drives, network communication, etc. i.e CPU remains idle during this period.
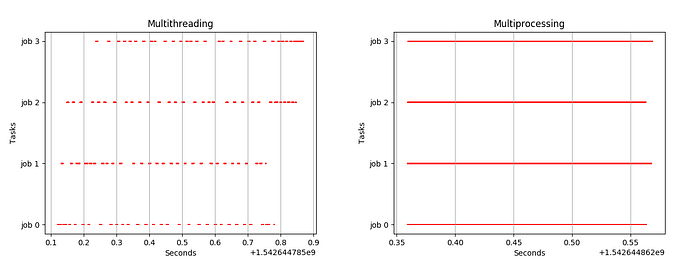
From the above figure, we conclude that because of GIL, python program runs on a single core at a time, switching from one core to another keeping the lock on the rest of the cores. So, even having multiple threads running on a separate core, we can’t achieve multithreading. So, It’s better to perform multithreading in case of I/O bound processes and multiprocessing for CPU bound processes. Python 3.7 provides concurrent.futures module, which can be used to achieve multiprocessing and multithreading.
a) concurrent.futures.ThreadPoolExecutor: This should be used for I/O bound programs like making network calls. It creates a pool of threads where no. of workers needs to be defined. The example is below taken from the official documentation to illustrate:
import concurrent.futures
import urllib.request

URLS = ['http://www.foxnews.com/',
        'http://www.cnn.com/',
        'http://europe.wsj.com/',
        'http://www.bbc.co.uk/',
        'http://some-made-up-domain.com/']

# Retrieve a single page and report the URL and contents
def load_url(url, timeout):
    with urllib.request.urlopen(url, timeout=timeout) as conn:
        return conn.read()

# We can use a with statement to ensure threads are cleaned up promptly
with concurrent.futures.ThreadPoolExecutor(max_workers=5) as executor:
    # Start the load operations and mark each future with its URL
    future_to_url = {executor.submit(load_url, url, 60): url for url in URLS}
    for future in concurrent.futures.as_completed(future_to_url):
        url = future_to_url[future]
        try:
            data = future.result()
        except Exception as exc:
            print('%r generated an exception: %s' % (url, exc))
        else:
            print('%r page is %d bytes' % (url, len(data)))
Here, four HTTP requests are being made which is obviously I/O operation, so it’s the best use-case to apply multithreading. Five workers are created, the 4 load_url requests will be submitted at a time. The CPU keeps on changing the context from one thread to another allowing the data to buffer during the execution of other threads. as_completed the method provides the future order in which processing has completed. result() gives the output of the method. It can be understood from another example:
b) concurrent.futures.ProcessPoolExecutor: This should be used for CPU bound programs like making enough CPU computations. The example is below taken from the official documentation to illustrate:
import concurrent.futures
import math

PRIMES = [
    112272535095293,
    112582705942171,
    112272535095293,
    115280095190773,
    115797848077099,
    1099726899285419]

def is_prime(n):
    if n % 2 == 0:
        return False

    sqrt_n = int(math.floor(math.sqrt(n)))
    for i in range(3, sqrt_n + 1, 2):
        if n % i == 0:
            return False
    return True

def main():
    with concurrent.futures.ProcessPoolExecutor() as executor:
        for number, prime in zip(PRIMES, executor.map(is_prime, PRIMES)):
            print('%d is prime: %s' % (number, prime))
Here, a number is being checked whether it is prime or not, which needs CPU computation. We have a list of 6 numbers, so we pass all the 6 numbers to process and check if it is prime via ProcessPoolExecutor. Since all the execution will be performed on separate cores and each core gets different interpreter, so GIL lock will not affect here and all the executor.map will run parallelly.
Enough Coding, Let’s Test! because ‘Something which is not tested is Broken’
Python has a few popular testing libraries like unittest, pytest, etc. Unittest is what I have used most. We just need to extend the class unittest.Testcase in the unit test class and self.assertEquals or self.assertTrue etc. to assert any values. Mocking can also be done by using unittest.mock and unittest.patch decorator. A Test Suite can also be created after creating the unit tests in a single file just by extending unittest.TestSuite class. Sample test example:
Code Hygiene: Coverage
Python library coverage can be used to test how many lines are covered by the unit test case written. A sample command is below:
pytest --cov=main test/ --cov-report term-missing
coverage run -m pytest
For code quality and analysis to detect a bug, code-smells, etc. Sonar can be used which performs the scanning of the python code.
Measuring the Response Time:
In order to measure the response time of each method at the granular level, we can use the below decorator \@timed above any method. It returns the time taken to process any method.
Project File Organization Structure
There can be several in which file can be organized, my own structure is as below:
main/ controller/
      resources/
      service/
      util/test/ controller/ test_filename.py
      resources/
      service/
      util/
requirements.txt
Dockerfile
docker-componse.yml
Deployment using Containers
A docker container needs to created where all the stacks like nginx,uwsgi, etc. need to be included/downloaded and an entry point to the WSGI server startup can be provided in the Dockerfile. I would suggest using alpine as the base image which is very lightweight. Containerization also helps in deploying the application to the Kubernetes cluster.
That’s all about how to create the microservice, will write more on the same. Please read my other stories as well and keep watching this space for more learning.
